A Brand New Warehouse
The trials and tribulations of designing the Wi-Fi for our new warehouse.
Trevor Krzesnik
11/2/202413 min read
After years of bouncing from building to building, trying to figure out the best place to have our warehouse, it was decided that we would be building our own. Going this route would allow us to work directly with the vendors and installers to customize our design to meet every need at the warehouse.
When the floor plans came through, we were astonished at the size of the building. I have designed wireless for some good sized buildings in the past but nothing compared to this. The new warehouse was going to be roughly 300,000 square feet with an office area, a large bulk racking section for miscellaneous material, a caged section with similar-sized racking, and the open floor area around and between all of the racking. The last, and most important section, was going to be the robotics racking. It was time to get into Ekahau and start planning a predictive design to accommodate all the different areas.
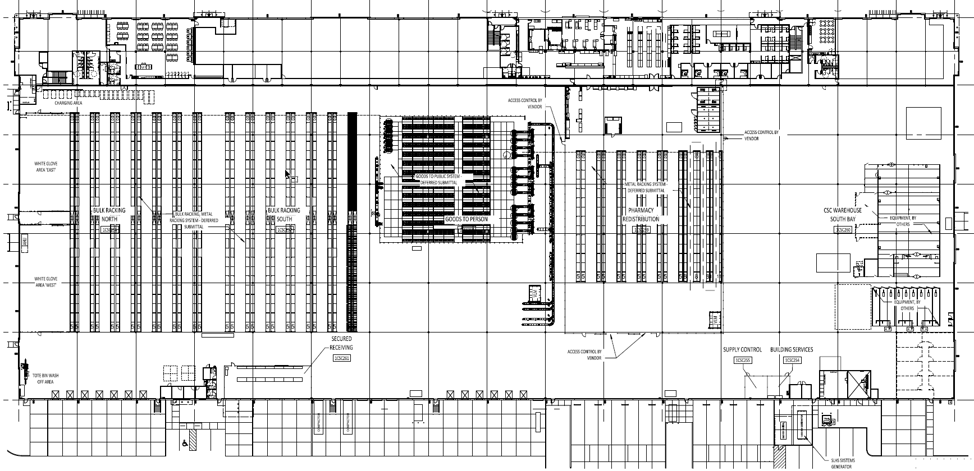
There are 3 main areas of focus for this design.
Office Area/Clean Core/General Warehouse
Large Bulk Racking/Pharmacy Racking
Robotics Racking
In the office area/clean core/general warehouse, we are looking to do omnidirectionals. This will allow us to provide good coverage without having to install anything in the clean core. A pretty straight forward design here as there will just be some cubicles, a conference room, and a break room. For the general warehouse area, we will just need to make sure we have coverage spread throughout the non-rack areas for general phone and laptop usage while maintaining roaming capabilities.
Define Requirements
The next area to design for is going to be the bulk racking sections. We are going to have two of these sections to design for. One is for general bulk racking and the other is the caged pharmacy area. These areas will use wireless scanners which will generally have the same offset as mobile phone as they try to maintain battery life while in use. Once the APs are hung, we can adjust our azimuth and elevation beam widths, if needed, to make sure we create the best coverage area possible throughout the entire aisle.
The last and most important area we are going to be designing for is the robotics area. In this area, we have thirteen 80-foot-long aisles that will have 28 high-speed robots roaming throughout the aisles. The robots will be picking stuff from the shelves and dropping them off at conveyor belts on each end of the racks. Strong coverage throughout the entire aisle is paramount to make sure we keep good SNR for high-speed transmissions. The signal quality, per the vendor, is requested to be greater than or equal to an RSSI of -65 and an SNR of 25 or greater. The device supports fast roaming utilizing 802.11k which will give us a neighbor report from surrounding APs and 80.211r which utilizes fast transition (FT). A dedicated SSID with static channels and no overlapping from neighboring APs was requested but not something we will be accommodating.
Design
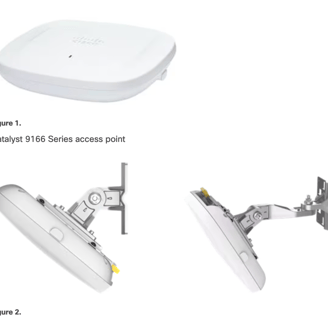
For the office/clean core/general warehouse areas, we are going to be going with the Catalyst 9166i access point. This option will allow us to future proof the design as it is Wi-Fi 6E capable, 802.11ax, and the ability to change between Cisco and Meraki platforms. With the need to support Workplace/Voalte phones, the vendor suggested RSSI is -67 but, to leave some wiggle room, the minimum RSSI throughout the office area is going to be -65. Not only do we want a strong primary signal, but to make sure we stay covered when an AP goes offline, we are going to design to have a strong secondary signal as well. The target secondary signal is going to be -67 which will generally put the distance between APs 35 to 40 feet.
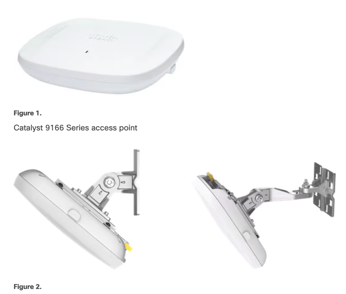
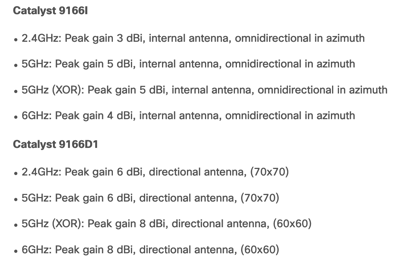
For the large bulk racking sections, we are going to go with the Catalyst 9166D for similar reason as the 9166i but we will be able to adjust the azimuth and elevation beam widths to maximize coverage throughout the aisles. The large bulk section aisles are about 200 feet in length so we are going to be placing access points at each end. Then for the pharmacy racks we will alternate APs in the aisles since our length is just over 100 feet. The mounts our access points are connected to allow us to adjust the azimuth and elevation so, to start, we are going to be mounting the access points in the center of the aisle with a 50 degree downward tilt for the longer aisles and then 60 degrees in the pharmacy area. The mounting height here is going to be 30 feet above floor.
The last, and most important, section we will be designing for is the robotics area. Here we have thirteen 80-foot-long aisles. Since the aisles are shorter here we should be fine to place the access points alternating in the aisles instead of having an AP at each end of the racks. Since we are only putting the APs on one end, we will want the signal to travel a bit further so we will place our tilt at 60 degrees instead of 50 like we did on the large aisles. The aisles here are closer together so when the racks are full that should help our signal stay focused in the aisles and keep co-channel contention to a minimum. The mounting height here will also be 30 feet above the finished floor. This will keep the access points at a safe height and avoid being hit by the robots as they exit the aisles.
We worked directly with our cabling vendor to figure out the best way to hang the access points safely and ensure they were pointed correctly down the aisles at the right angles. For our general warehouse APs, we had them hung from the ceiling with beam clamps and all-thread so the bottom of the access point was 30 feet above the finished floor. As an added safety measure, the access points were attached to a piece of guide wire that goes to the ceiling just in case they were to get hit by anything.
For the aisles where we will be hanging directionals, instead of having each access point attached to a piece of all-thread, we will use long pieces of uni strut with u-bolts to connect the APs. This will ensure the APs are all hung at the same height and we can make minor adjustments with the holes in the uni strut without having to reassemble large pieces of hardware to rehang the access point. I have attached pictures below of what the directionals and omnidirectionals look like hanging from the ceiling.
Deploy and Validate


After all of the APs were hung, it was time to survey the building and see if the design came to fruition or if we needed to make any adjustments. The first part of the building we want to check is the office/conference room/break room area. Our target RSSI is -65 with good secondary coverage. As you can see in the picture below, the walls used for the clean core drastically attenuate our signal but wireless is not needed so we're ok with that here.


Primary Signal
Secondary Signal
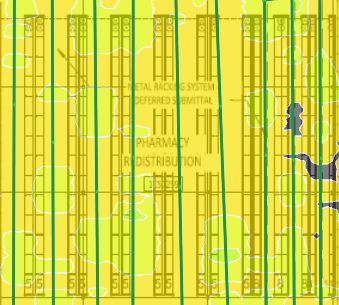
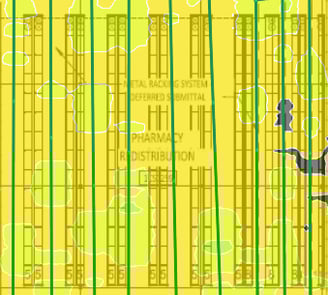
The next area we will look at is the two large bulk racking sections. As mentioned in the requirements section, we will have wireless scanners and mobile phones connecting in these areas. These will be our least capable, most important (LCMI) devices for both bulk racking sections. Without having a wireless scanner available to test with, we will have to start with a preset generic barcode scanner which will have a -10 dB offset from our measured signal. After turning on the offset, we can see there is one spot in the middle of the large bulk racking that doesn't quite meet our -65 signal requirement so we need to see exactly what kind of signal we're getting here.
As we can see, we're getting a signal of -66 here which is just 1 dBm off of our target signal. If this were 5 to 6 dBm off of our target we would need to do some tilt adjustments but we shouldn't have to in this case. We should still get high MCS rates with our signal being above -70.
Moving onto the next section, we will look at our signals in the caged pharmacy racks. Here we have similar devices, wireless scanners, and mobile phones, connecting to our access points and roaming through the aisles. Our target RSSI will be a minimum of -65 with minimal co-channel contention. A measured signal and barcode offset check show we should have the necessary signal for our devices to function and roam without issues. We will still need to verify device connectivity when we have a scanner available to test with.
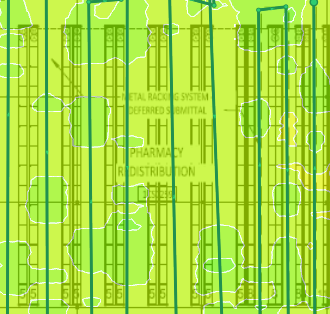
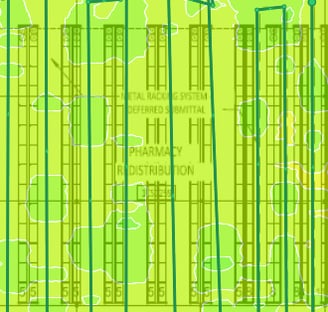
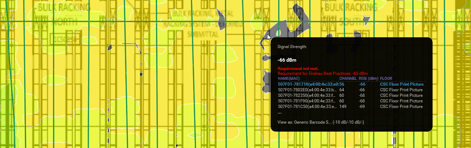
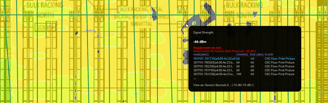
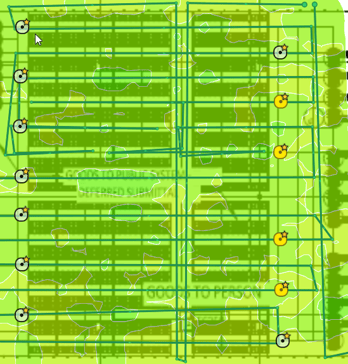
We have reached our most important area for wireless, the robotics shelving. As mentioned above in the requirements section, our target RSSI is -65 or greater to give ourselves an SNR of 25 or higher. With aisles of 80 feet and tighter shelving, we should have no problems maintaining good signals as the robots move from section to section. Our initial survey will show our signals more spread out since we do not have bins on the shelves yet. This will have an impact on RRM and our APs will have slightly lower power until we can keep the signals more focused in the aisles they are pointed down. Looking through the power levels of our access points, they are all sitting at 14-15 dBm so we have room to improve our signal strength if needed. At this point, we are going to leave them where they are at until the shelves are filled.
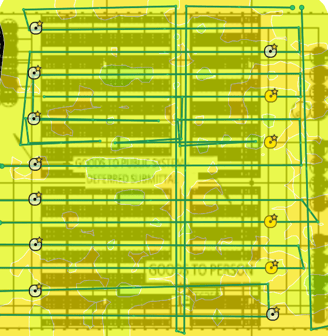
Measured
Scanner

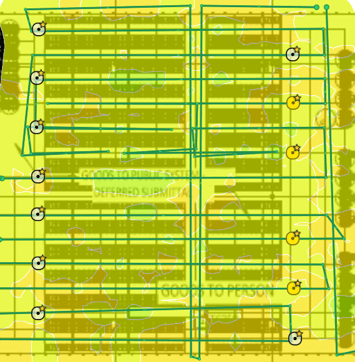
Measured
Mobile
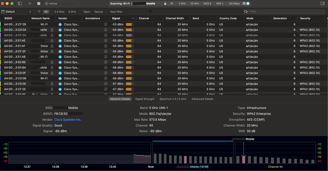
We will also do some validation testing with Wi-Fi Explorer 3 on a Mac laptop. As you can see below, we have good coverage surrounding us and are currently connected with an RSSI of -65 and a noise of -95 so our current SNR is at 30. Our security settings look correct and we don't see any of our SSIDs showing an AP using anything but 20 MHz channels. One thing you will notice is that the APs all show using channel 64 which I will go into more detail on why we are seeing that shortly.

The last, and most important, bit of testing we will need to do is with the robots themselves. We are currently waiting to get those connected to the network and will update those test results when available. A cool feature of the robots is after they connect and move about the aisles, they will draw a heatmap of how they see the signal so it will be very clear if we need to make any adjustments to our coverage.
Troubleshooting
At some point in my career, I came across the saying "A calm sea never made a skilled sailor" which I always try to remind myself when something doesn't go as planned. We had a few things happen here which made me get into the logs of the access points, read through the 9166 data sheets, and do some bug research.
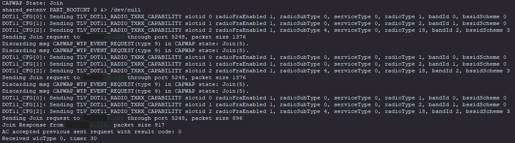
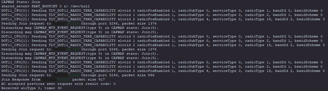
When we first got the APs for the warehouse, I wanted to get them connected to the controller they were going to live on to test and get some devices connected to them. I plugged the 9166i AP in and it connected up and downloaded it's firmware with no issue. I renamed the AP and then configured it to use the tags I wanted to test with. After connecting a couple devices I unplugged it and plugged in the 9166D. I waited for it to connect up and start downloading it's firmware but it never did. It just flashed red and green repeatedly. I consoled into the AP and watched as it booted to see if I could get an idea of what was going on and it didn't take long to appear.
This was something I had not seen before so it was time to do some research. I looked at the Cisco 9166 datasheet and was able to quickly figure out what was going on. The controller the access point was attempting to connect to was on 17.9.4a firmware so it was rejecting the APs join request.
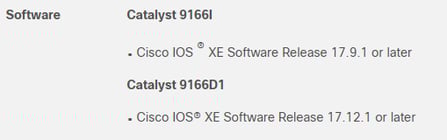
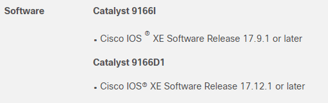
Upgrading the controller it was attempting to connect to was not an option. This is a production controller and we weren't ready to upgrade without testing the new code first. The golden image to upgrade to was 17.12.3 so luckily we have a test controller available to do this when needed. I installed the new firmware on the controller and then plugged the AP in while I was consoled in and watched the boot again. Everything looks much better and the access point was able to join and download the new firmware.


After we had 20-30 APs installed, I wanted to get them mapped in one of our network monitoring tools, Prime and/or Catalyst Center. I got everything added and named and was putting them on the map when I started to notice something. Only the 9166i access points were available to place on a map and in Catalyst Center only. Time to look at the datasheet again.
Problem #1
Problem #2
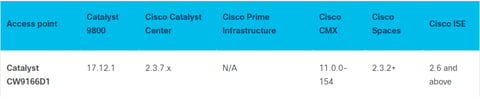
With the announcement that Prime was EoL, it makes sense they would make it unavailable in the newer models to encourage people to use Catalyst Center instead. I looked at the firmware version we are currently running on our Catalyst Center VM and, lo and behold, we are running 2.3.5. To be able to manage our 9166D access points, we will have to upgrade our Catalyst Center version to the recommended 2.3.7 so we are currently waiting for that to be done. Until then, they will have to be managed directly from the controller.
Problem #3
The last problem we ran into was mentioned earlier when I showed what the connections looked like with Wi-Fi Explorer. For some reason, after all the directional APs had been installed and we let them sit for a couple of days, we had quite a bit of co-channel contention on channel 64. Maybe we had some access points come up a little later after RRM was run, so I reran it manually using the command ap dot11 5ghz rrm dca restart. I checked all of the APs about 30 minutes later and we still had numerous APs, only 9166Ds, that would not move off channel 64. At this point, we would just have to manually set them until we could figure out what was going on.
Earlier in the year I had signed up to receive daily updates on bugs with all our AP models and controllers, and wouldn't you know it, I got an update that fit exactly what was going on with our access points, '9166D APs unable to transmit NDP packets over the air.' The symptoms were RRM would put the APs on the same channel leading to co-channel interference in the area and the conditions needed for that to happen were 9166Ds running on 17.12.3 running in local mode which fit us exactly. There is currently not a workaround with the current code at the moment but the known fix is to upgrade to 17.12.4 or higher. If you want to learn more about the bug and are able to access Cisco's Bug Search tool, here is the link.
As you can see there were certainly some ups and downs as we navigated through this design. I definitely learned a lot along the way and am looking forward to testing more devices as we get closer to our opening date in less than month now.
Project Update (12/5)
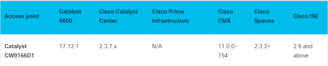
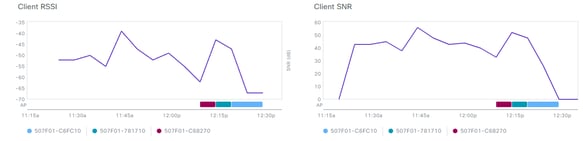
I was finally able to get ahold of a couple of the handheld scanners and walk all the aisles and see what kind of signals they were seeing. One device was your typical handheld barcode scanner gun and the second device was a tablet scanner. I was very happy with the numbers I was seeing as I walked through the aisles. I even grabbed the connection history of my cell phone that was in my pocket.


Tablet Scanner
Traditional Scanner
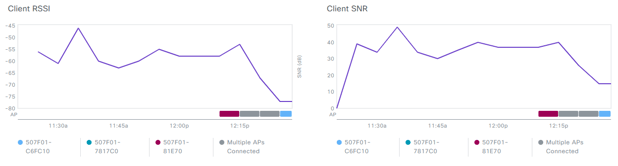
iPhone 14
The two barcode scanners held signals of greater than -60 almost the entire time I walked. There was one time the tablet scanner had the RSSI drop to -62 but the SNR still was above 30 so no problems whatsoever. I walked through 38 aisles and didn't have a single roaming failure. The one thing I did notice is that, because there is nothing in the warehouse racks yet, the signals from the APs were straying pretty far from where they were intended to go. The signals will hopefully be focused properly once the aisles are filled and we can get more attenuation between the racks.
It's great to have the survey results to present to the project manager to show we have good wireless coverage throughout the building. It's even better when we have the client data to validate. All that's left to test at this point is the robots which should be happening at the beginning of the year. Stay tuned!